What Is a Sewer Camera Inspection?
A sewer camera inspection uses a waterproof camera on a flexible cable to view the inside of a drain or sewer line. It helps you find blockages, cracks, breaks, root intrusion, and other problems without opening the pipe first.
On this page (9 sections)
- What is a sewer camera inspection used for?
- How does a sewer camera inspection work?
- What can you see inside a drain or sewer line?
- How do you prepare for a camera inspection?
- Which sewer camera should you use at home?
- Does a sewer camera need a locator?
- How do you read the camera image?
- What should you do after finding a pipe problem?
- What is a sewer camera inspection worth for a homeowner?
A sewer camera inspection uses a waterproof camera on a flexible cable to view the inside of a drain or sewer line. It gives you a direct look at blockages, cracks, root intrusion, separated joints, and other pipe problems before you dig, cut walls, or guess at a repair.
The camera travels through an access point such as a cleanout, drain opening, or larger pipe entry. A monitor shows the live image while cable markings help estimate how far the camera has traveled.
What is a sewer camera inspection used for?
A sewer camera inspection finds the location and type of a pipe problem without opening the entire line. It can show whether slow drainage comes from a blockage, damaged pipe, roots, or a change in the pipe interior.
The camera head sends video through the cable to a screen above ground. You can watch the line as the camera moves and record useful sections for later review.
Common inspection targets include:
- Main sewer lines from a home to the property connection
- Drain pipes under floors, yards, or driveways
- Lines serving kitchens, bathrooms, laundry areas, or outdoor drains
- Ducts, stormwater lines, and other accessible pipe runs
A camera does not repair the pipe. Its value is showing where the problem is before choosing cleaning, repair, replacement, or further investigation.
How does a sewer camera inspection work?
The operator feeds a camera attached to a semi-rigid cable into an accessible pipe opening. The monitor displays the camera view, while adjustable lights illuminate dark sections.
Before starting, clear the area around the cleanout or drain and plan where the cable will go. Feed the cable slowly, avoid forcing it around a tight turn, and note the cable markings when the camera reaches a visible defect.
A useful inspection records the direction of travel and the distance to important findings. Slow down when you see standing water, a joint, a blockage, a crack, roots, or a change in pipe shape.
After the camera comes back out, clean the camera head and cable as directed. Keep the recorded footage with notes about the access point and approximate distance.
What can you see inside a drain or sewer line?
A sewer camera can show grease buildup, sediment, roots, broken sections, open joints, and objects blocking the pipe. It can also show whether the camera reaches a suspected problem or stops before it.
The image is only as useful as the view. Dirty water, mud, heavy deposits, or a lens covered with debris can hide details, so a dark frame is not proof that the pipe is clear or damaged.
A camera shows the inside surface from one path through the pipe. It does not automatically reveal every issue outside the pipe, under the ground, or behind a wall.
For location work, a model with a transmitter and receiver can help identify where the camera head sits below ground. The best sewer cameras with a locator guide is useful when the repair decision depends on finding the camera from above.
What does the inspection distance tell you?
The cable distance tells you how far the camera has traveled from the access point, not the straight-line distance to the property boundary. Bends, slopes, and branch connections make the route longer than the surface measurement.
Write down the cable mark when you reach a problem and identify the access point used. That gives a plumber or contractor a starting point for tracing the pipe.
How do you prepare for a camera inspection?
Prepare by finding a workable access point, clearing the area, and deciding what you need to learn. A cleanout is often easier than a small fixture drain because it gives the camera a more direct path.
Remove standing water or loose debris around the opening so the equipment stays cleaner. Keep towels nearby for the cable and protect flooring or finished surfaces around indoor access points.
Think through the question you want answered. You may need to know why a drain backs up, whether a line has roots, where a break begins, or whether a pipe is open enough for cleaning equipment.
If the camera stops at a bend, do not assume the pipe ends there. A tight turn, smaller section, or heavy obstruction can stop the cable.
A different access point or shorter camera may be more useful than pushing harder.
Which sewer camera should you use at home?
The best camera depends on pipe distance, line size, the need to locate the camera, and how much recorded detail you want. For a long run with location work, the VEVOR 165 ft model is the clearest fit.
Best for long lines and locating the camera
The VEVOR 165 ft Sewer Camera With Locator combines a 165 ft semi-rigid cable with a built-in 512Hz transmitter and locator receiver. Its 9-inch 720p screen, 1-megapixel camera, 12 adjustable LEDs, DVR function, and 16GB SD card support longer inspections that need recorded evidence.
The camera has an IP68 rating, a 130° maximum inspection angle, a sapphire lens, and a 303 stainless steel housing. It supports straight pipes from 0.98 to 5.91 in and right-angle pipes from 1.97 to 5.91 in.
Pick this model when distance and underground location matter most. Its 21.7 lb weight and larger 9-inch display suit planned inspections more than quick checks in a tight indoor space.
Best for shorter household pipe runs
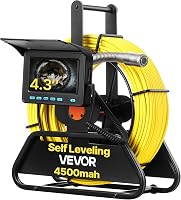
The VEVOR 98 ft Sewer Camera suits shorter inspections where you want a compact cable reel, live video, and simple recording. It has a 4.3-inch color screen, a 98 ft cable with distance markings, 6 adjustable LEDs, a 120° viewing angle, and a 16GB SD card.
Its IP68 camera supports straight pipes from 1.18 to 3.93 in and right-angle pipes from 1.97 to 3.93 in. The rechargeable 4500mAh battery is rated for up to 5 hours of continuous inspection.
Choose it for drain, pool pipeline, HVAC, and sewer work within its cable range. It is easier to carry than the larger 165 ft setup, but it does not include a 512Hz transmitter or locator receiver.
Best for a larger screen and long battery use
The ChoosePRO 7-Inch Sewer Camera focuses on screen size, recorded video, and cable handling. It has a 7-inch IPS display, a 1080p camera, 16× zoom, a 100 ft marked cable, a 32GB card, and a 5000mAh battery rated for over 8 hours.
The camera head has an IP68 rating and 6 adjustable LEDs with 3 brightness levels. The set includes 25mm and 84mm sleeves, a flexible stainless steel spring tip, and a twist-to-open reel system.
Pick this model when clear screen viewing and longer sessions matter more than a locator. Its 100 ft cable sits between the 2 VEVOR options, making it a practical fit for many home inspection runs.
Does a sewer camera need a locator?
A sewer camera needs a locator only when you must find the camera's underground position from the surface. The camera can still show the pipe interior without one, but the locator lets you trace the camera head through soil, flooring, or another barrier.
The VEVOR 165 ft model includes a 512Hz transmitter in the camera probe and a receiver that tracks the signal. That makes it useful when the next step is marking a dig point or estimating where a damaged section sits below ground.
A locator is less important for a short indoor drain where the access point and cable distance already identify the area. In that situation, screen size, lighting, cable length, and recording features deserve more attention.
The Anysun vs VEVOR sewer camera comparison can help if you are choosing between camera systems with different reach and locating features.
How do you read the camera image?
Read the image by watching the pipe walls, the path ahead, the water level, and the cable distance together. A single feature can mislead if the camera is tilted, partly submerged, or facing a deposit.
A normal open section should show a continuous interior path ahead. A blockage may appear as a solid obstruction, while roots can look like tangled growth entering through a joint or opening.
Cracks and breaks vary in size and shape. Pause the video when a possible defect appears, move the camera back and forward slowly, and record the distance mark.
Self-leveling helps keep the picture upright as the camera moves through a pipe. If that matters for your work, compare the options in best self-leveling sewer cameras.
A non-self-leveling camera still provides useful footage, but you may need to interpret the view based on the camera's rotation.
What should you do after finding a pipe problem?
After finding a problem, save the video, note the access point and cable distance, and decide whether the next step is cleaning, locating, repair, or a second inspection. The footage gives direction, but the repair method depends on pipe condition and access.
A blockage may call for cleaning before another camera pass. A damaged section may need a locator reading, a contractor's assessment, or a targeted opening rather than full excavation.
Keep the camera and cable clean after use, especially after contact with sludge or standing water. Protect the lens, store the cable neatly on its reel, and recharge the battery before the next inspection.
For a lower-cost way to compare inspection tools, see best budget sewer cameras. Match the camera's cable length and pipe range to the job instead of choosing by screen size alone.
What is a sewer camera inspection worth for a homeowner?
A sewer camera inspection is worth doing when a drain problem keeps returning, a line may be damaged, or you need to locate a defect before opening the ground or a finished surface. It changes a vague plumbing problem into a recorded view with an approximate distance.
Pick the VEVOR 165 ft model when long reach and a locator are central to the job. Choose the VEVOR 98 ft model for shorter runs with a smaller setup, or choose the ChoosePRO 7-Inch Sewer Camera when a larger 1080p screen, zoom, and extended battery use matter most.
The practical answer to what is a sewer camera inspection is simple: it is a camera-guided look inside a pipe that helps you decide what needs to happen next.
Frequently asked questions
How far can a sewer camera inspection reach?
The distance depends on the camera cable and the pipe layout. The VEVOR 165 ft model reaches farther than the 98 ft VEVOR model or the 100 ft ChoosePRO model, but bends, pipe size, and cable stiffness also affect how far the camera can travel.
Can a sewer camera find a leak?
A camera can show visible cracks, separated joints, holes, standing water, or other signs linked to a leak. It cannot measure every leak from video alone, so the footage should be treated as a visual inspection of the pipe interior.
Do sewer cameras work in standing water?
A waterproof camera can view wet or flooded sections when the lens remains clear and the cable can move through the pipe. The VEVOR and ChoosePRO camera heads have IP68 ratings, but heavy flow, mud, and debris can still block the view.
Should you clean a drain before a sewer camera inspection?
Cleaning is useful when grease, sludge, or loose debris blocks the camera's view or stops the cable. Start with the inspection if you need to identify the cause of a blockage, then clean the line after you know where the problem is.