Types of Inspection Cameras Explained
The main types of inspection cameras are handheld borescopes, pipe inspection cameras, drain cameras and specialty cameras for tight spaces. Choose by the area you need to reach, the camera head size, cable length and whether you need to save images.
On this page (13 sections)
- Types of Inspection Cameras Explained
- Which types of inspection cameras cover the main jobs?
- What is a handheld borescope?
- When is a drain camera the right choice?
- What makes a pipe inspection camera different?
- What is a sewer camera used for?
- Which camera type works behind walls and cabinets?
- What type of inspection camera suits crawl spaces?
- Can you use an inspection camera in an attic?
- How do camera head size and cable length change the choice?
- Which features matter after the camera reaches the target?
- How should you choose between the 3 featured handheld cameras?
- What is the final rule for choosing an inspection camera?
Types of Inspection Cameras Explained
The main types of inspection cameras are handheld borescopes, drain and pipe cameras, sewer cameras, and specialty cameras for hard-to-reach areas. For most short inspections, start with a handheld model, then move to a longer pipe camera when the cable must travel deep into a drain.
The right type depends on the work area. A camera for checking behind a wall has different needs from one that must travel through a sewer line.
Compare the camera head diameter, cable length, cable stiffness, screen, lighting, water resistance and recording features. These details determine where the camera can go and how useful the image will be.
Which types of inspection cameras cover the main jobs?
The best camera type matches the distance, opening and surface you need to inspect. Handheld borescopes cover short inspections, while pipe and sewer cameras handle longer plumbing runs.
| Camera type | Best starting use | Main design priority |
|---|---|---|
| Handheld borescope | Behind walls, appliances and fixtures | Compact head and easy live viewing |
| Drain camera | Household drains and branch lines | Flexible reach through bends |
| Pipe inspection camera | Longer plumbing runs | Cable reach and controlled pushing |
| Sewer camera | Larger or deeper sewer lines | Long cable, line tracking and pipe access |
| Specialty inspection camera | Crawl spaces, attics and machinery | Access to a specific tight location |
| Articulating camera | Viewing around corners | Directional camera movement |
A handheld borescope is usually the simplest option because the display and camera are built into one unit. It works well when a short cable can reach the inspection point.
Drain and pipe cameras need good pushability. A cable that is too soft can fold inside a pipe, while one that is too stiff can struggle with bends.
Sewer cameras sit at the heavy-duty end. They are intended for longer lines and larger access points, where a short handheld cable cannot reach.
Specialty cameras are defined by location rather than pipe. An attic or crawl-space camera may need a compact head, bright lighting and an easy-to-read screen.
Use a handheld borescope for short access points, and choose a pipe or sewer camera only when the inspection requires deeper travel.
What is a handheld borescope?
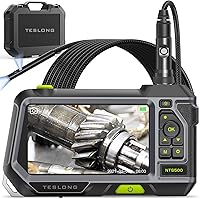
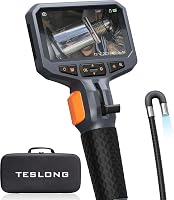
A handheld borescope combines a small camera head, flexible cable, lights and a built-in screen. It is the best general-purpose type for viewing tight spaces without a separate monitor.
The camera head enters a gap, hole or opening while the display stays in your hand. This suits inspections behind appliances, inside wall cavities, around plumbing fixtures and in other difficult spaces.
Handheld models vary in head size and cable length. A smaller head fits more openings, while a longer cable gives more reach.
A short cable is easier to manage but limits distance.
Lighting is part of the system. Dark cavities need adjustable LEDs or another built-in light source because the camera cannot show useful detail without illumination.
A handheld borescope works well for a quick live view rather than a full pipe inspection. It can help locate a blockage, find a loose part or observe a damp area before opening a larger section.
The Ridgid Micro CA-25 Inspection Camera has an ergonomic pistol-grip design and a 2.7 in color LCD display. Its camera head and cable are waterproof, and the head includes a hook, magnet and mirror.
It provides fixed focus and a 17mm focal length, rotates images 180 degrees and includes Video Out for transferring a live view to another device.
Choose a handheld borescope when you need simple, close-range access and a built-in screen.
When is a drain camera the right choice?
A drain camera is right when the camera must travel inside a household drain and pass through bends. Its job is to show the inside of a line while the cable moves through the plumbing path.
Drain work places different demands on a camera than a wall cavity. The cable must move forward without losing control, and the camera head must fit the line while handling moisture.
A drain camera can trace a blockage, show buildup or check a line before repair work. Cable length matters, but bends, narrow fittings and changes in direction reduce practical reach.
A camera designed for drains can also help with other wet inspection areas. Keep the display and connections protected, even when the camera head is made for wet use.
For choosing equipment around plumbing fixtures, see our guide to an inspection camera for plumbing.
The Milwaukee M12 M-Spector 360 Inspection Camera has a 4.3 in LCD screen and captures images and video to an included SD card. Its 360 image rotation lets you adjust the view by rotating the screen or pressing a button.
It also offers 3x optical zoom and 720p video capture. Its 3/8 in hole fit supports access through openings, including spaces behind walls.
Pick a drain camera when the camera must move through plumbing rather than simply look into a nearby gap.
What makes a pipe inspection camera different?
A pipe inspection camera is built around reach and controlled movement through a pipe. The longer the route, the more important the cable system becomes.
Pipe cameras often use a push cable that travels farther than the short flexible cable on a handheld borescope. The cable must stay manageable in storage while holding enough shape to move through the pipe.
The camera head should match the pipe size and route. A head that is too large can stop at the entry point, while a smaller head may provide less room for lighting and image controls.
Image rotation or digital zoom helps when the camera moves through a pipe. Recording is useful when you need to document the condition for a repair estimate or maintenance record.
Some handheld cameras can connect to larger pipe systems. The Ridgid Micro CA-350 Inspection Camera can work with micro Reel, micro Drain and Nano Reel SeeSnake systems, extending reach up to 100 feet with those reels.
The Ridgid Micro CA-350 Inspection Camera has a 17mm imager, a 3 1/2 in color display and a rechargeable 12V lithium-ion battery. It records still images and videos in MP4 and JPG formats and supports external memory.
The system includes image rotation, digital zoom, USB and RCA connections, an 8GB SD card and hook, magnet and mirror accessories.
Choose a pipe inspection camera when reach, recording and controlled cable movement matter more than the smallest handheld package.
What is a sewer camera used for?
A sewer camera is designed for deeper, larger or more complex underground lines. Use one when a short borescope cannot reach the inspection area or when you need to trace a longer sewer route.
Sewer inspections often begin at a cleanout or access point. The camera travels through the line while the operator watches for breaks, roots, offsets, standing water or other changes.
Long cable systems distinguish sewer cameras from handheld units. They need enough push strength to travel through the line while following bends without becoming difficult to control.
A locating feature is valuable when you need to mark a problem above ground. The camera image shows what is happening inside, while the locator connects that view to a surface position.
Sewer cameras also need a suitable entry point. A large system may be the wrong tool for a small fixture opening, even if it provides more reach.
Pick a sewer camera for long underground inspections, and use a handheld or drain camera for shorter accessible sections.
Which camera type works behind walls and cabinets?
A handheld borescope is usually the best choice behind walls, cabinets and appliances. The camera head must fit the opening, and the cable must bend without losing the view.
Behind-wall work often starts through a small drilled hole or existing service opening. A compact head reduces access size, while a flexible cable helps angle the view around framing, pipes and wiring.
A screen attached to the handle makes short inspections easier. You can guide the cable with one hand while watching the display with the other.
Image rotation helps when the camera enters from an awkward angle. Zoom can help examine a small area, but it does not replace proper lighting or a clear camera position.
A hook and magnet can help retrieve a small metal item or move a light object inside a cavity. A mirror attachment changes the viewing angle when the direct view is blocked.
The Ridgid Micro CA-25 fits this work with its 3/4 in camera head, pistol-grip handle, adjustable LEDs and included attachments.
Choose a small handheld camera for wall and cabinet access, and size the camera head to the smallest opening you plan to use.
What type of inspection camera suits crawl spaces?
A handheld borescope suits most short crawl-space checks because it is compact and easy to carry. Choose a camera with enough cable to reach the target without forcing your body into the tightest section.
Crawl spaces can contain low clearances, pipes, wiring and uneven surfaces. A flexible cable lets you inspect around obstacles while keeping the display in a comfortable position.
Lighting is especially important. The camera's LEDs need to illuminate the immediate area, while the screen must show enough detail to distinguish surfaces and connections.
A camera head that handles damp conditions is useful when the space contains moisture. Water resistance for the head and cable does not make the entire handheld unit suitable for water exposure.
Inspect from an access point first. Use the camera to find the source of a concern before deciding whether a longer cable or larger pipe system is necessary.
Our guide to the best inspection camera for crawl space compares features that matter in low, dark access areas.
Pick a compact handheld camera for crawl-space viewing, and choose a longer pipe system only when the camera must travel beyond the access area.
Can you use an inspection camera in an attic?
Yes, a handheld inspection camera can help view tight attic areas, insulation edges, roof framing and service spaces. The best type for an attic is usually a compact borescope with adjustable lighting and enough cable to reach past the access opening.
Attic inspections involve limited footing and awkward angles. A handheld display lets you stay near the access point while the camera reaches toward the area you need to observe.
Image rotation helps when you push the camera upward, sideways or across a beam. Adjustable light is useful where insulation or framing blocks ambient light.
Keep the cable under control. A loose cable can snag on framing or insulation, and pulling hard can change the camera angle before you record the view.
Recording helps when you need to remember what you saw or share the result with a contractor. Still images document a specific area, while video shows how the camera moved.
For a step-by-step approach, read how to check an attic with an inspection camera.
Use a handheld borescope for attic access, and prioritize camera control and lighting over long pipe-camera reach.
How do camera head size and cable length change the choice?
Camera head size controls access, while cable length controls reach. Choose the smallest head that fits the opening and the shortest cable that reaches the target with room to work.
A larger head can carry useful lighting and imaging hardware, but it needs a larger opening and may be harder to guide through bends. A smaller head enters tighter spaces, though image area and controls vary.
Cable length is not the same as useful inspection distance. Bends, fittings, insulation and other obstacles reduce practical reach.
A flexible cable works well for short spaces and curved paths. A stiffer cable can push farther through an open route, but it takes more effort to guide and store.
Consider where the display will be while the camera is in use. A short cable is easier to keep close, while a longer cable lets you stand away from the access point.
The Ridgid Micro CA-25 uses a 3-foot RCA cable and a 3/4 in camera head. The Milwaukee M12 M-Spector 360 has a 10mm camera head, a 3/8 in hole fit and a 4-foot inspection cable.
Match head diameter to the access point first, then select cable length and stiffness for the route.
Which features matter after the camera reaches the target?
The useful features after access are lighting, viewing controls, recording and storage. A camera is easier to use when you can see, orient and save the image without moving the equipment repeatedly.
Adjustable LEDs help control bright and dark areas. Too little light hides detail, while too much can reduce contrast on a nearby surface.
Image rotation keeps the view understandable when the camera enters from an unusual angle. The Ridgid Micro CA-25 rotates images 180 degrees, while the Ridgid Micro CA-350 includes image rotation and digital zoom.
Zoom can help inspect a display detail, but it does not move the camera closer. Move the camera when you need a clearer view of a distant feature.
Recording matters when the inspection supports a repair decision or report. The CA-350 saves still images and videos, while the M12 M-Spector 360 captures images and video to an SD card.
Connection options affect sharing. The CA-25 includes Video Out, and the CA-350 includes USB and RCA connections.
Choose lighting and viewing controls for immediate diagnosis, then add recording and storage when the inspection needs documentation.
How should you choose between the 3 featured handheld cameras?
Choose the camera whose access, viewing and recording features match the work. The Milwaukee M12 M-Spector 360 is the strongest general pick here because its 10mm head, 4.3 in screen, 360 rotation, zoom and SD-card recording cover many inspections.
The Ridgid Micro CA-25 is the simplest fit for short visual checks. Its 3/4 in waterproof head, 4 adjustable LEDs, 3-foot RCA cable and retrieval accessories make it useful around tight, damp areas.
The Ridgid Micro CA-350 is better when you need a larger screen, rechargeable power and recorded job reports. Its 17mm imager, 3 1/2 in display, MP4 and JPG support and selected SeeSnake compatibility give it a wider role.
The Milwaukee M12 M-Spector 360 focuses on compact access and clear control. Its 10mm camera head fits a 3/8 in hole, while the 4.3 in LCD, 720p video, 3x optical zoom and 5-mode brightness support detailed viewing.
Use pipe inspection cameras when your route extends farther than a handheld cable can reasonably manage. A handheld camera cannot replace a longer controlled push system when the problem lies deep in a line.
Pick the Milwaukee for broad short-inspection use, the CA-25 for simple close work, and the CA-350 for recording and reel-based reach.
What is the final rule for choosing an inspection camera?
Start with the access point and route, not the screen or brand name. The types of inspection cameras differ mainly in how far they reach, how they move, what openings they fit and how they document what you see.
Choose a handheld borescope for walls, cabinets, attics, crawl spaces and other short inspections. Choose a drain camera when the camera must move through a household plumbing line.
Move to a pipe camera when you need more controlled reach and recording. Choose a sewer camera for longer underground lines that need a dedicated cable system and, where needed, surface locating.
Among the featured handheld options, the Milwaukee M12 M-Spector 360 is the clear pick for most readers because it combines a 10mm head, 4.3 in screen, adjustable brightness, 360 image rotation, zoom and SD-card recording.
Choose the Ridgid Micro CA-25 when the job is short and the waterproof head, LEDs and retrieval tools matter most. Choose the Ridgid Micro CA-350 when you need recorded stills and video, a rechargeable battery and selected SeeSnake compatibility.
Pick the camera type that fits the opening and reaches the target without forcing a short borescope to do a pipe camera's job.
Frequently asked questions
What is the most common type of inspection camera?
A handheld borescope is the most common starting point for short inspections behind walls, under fixtures and inside small openings. It combines a camera head, flexible cable, lights and a screen in one tool, while larger pipe cameras suit longer runs through drains and sewer lines.
What is the difference between a borescope and a pipe camera?
A borescope is usually built for short-range viewing in narrow spaces, while a pipe camera is designed to travel farther through a drain or sewer line. Pipe systems often need a longer push cable, stronger guidance and a locating method in addition to the camera view.
Can an inspection camera be used underwater?
Some inspection cameras have a waterproof camera head and cable for viewing wet areas or water-filled spaces. Waterproofing applies to the parts identified for that use, so keep the display, controls and connections away from water unless their instructions allow it.
Do all inspection cameras record video?
No. Some cameras focus on live viewing, while others save still images and video to internal or removable storage.
Choose a recording model when you need job reports, before-and-after comparisons or footage that another person must review later.
What camera head size is best for a small opening?
A smaller camera head is easier to pass through a narrow opening, but the opening must still be large enough for the cable and head to bend through it. Compare the head diameter with the access point, then consider reach, lighting and screen controls.