How to Use a Drain Camera
To use a drain camera, feed the waterproof head down a flushed line by hand, watch the screen as it moves, and stop at anything that looks like a blockage or break. Pull it back slowly to check the same spot twice, then dry and coil the cable.
On this page (9 sections)
- What do you need before you run a drain camera?
- How do you prepare the drain before the camera goes in?
- How do you feed the camera down the drain line?
- How do you read what the camera shows?
- Why does the camera need a clean lens and a dry case?
- How do you confirm a blockage or damage?
- What should you do after the inspection?
- How do you keep the cable and screen working well?
- Which drain camera fits how you plan to use it?
To use a drain camera, feed the waterproof head down a flushed line by hand, watch the screen as it moves, and stop at anything that looks like a blockage or break. Pull it back slowly to check the same spot twice, then dry and coil the cable.
The job is less about the tool and more about the order you do things in. Prepare the drain, guide the cable gently, read what the screen shows, and record where you found it.
That sequence keeps the head clean and the findings usable.
What do you need before you run a drain camera?
You need a camera kit with a cable long enough for your line, a bucket or towels, and a way to flush the drain. Gloves and a rag keep the job tidier.
Pick a cable length that covers the run you plan to inspect. The Milwaukee M12 reaches 75 ft and fits 1-1/2 in to 4 in lines, while the Teslong kit runs 50 ft on a semi-rigid cable.
A short borescope arm like the Klein's 4.9 ft is for close work, not a long main line.
Clear the area around the cleanout or drain opening. Have a flashlight ready for the floor and a notepad or phone for cable-length notes.
Our guide to how to use a sewer camera on your own drain line covers the same prep for outdoor cleanouts.
Which drain camera suits a first inspection?
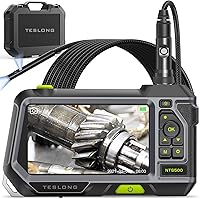
The Teslong 50 ft kit is the easiest starting point for a whole drain line. Its dual cameras show the pipe ahead and the wall beside it at the same time, and the 4.3 in screen tilts and rotates so you can read it while standing or crouching.
The semi-rigid cable pushes through straight PVC runs, though it struggles around tight 90° elbows and P-traps. Flush the line first, because murky water cuts visibility.
The kit ships with a hook, magnet and side mirror, and the detachable aviation connector lets you swap the probe for a different cable length later. Its 3000mAh rechargeable battery supports a full day of drain inspections.
A TF memory card is sold separately, so add a standard 32GB card in FAT32 format before you record video.
When is a short borescope the better tool?
The Klein ET18 suits short runs and tight spots rather than a full main line. Its 5.5 mm waterproof head on a 4.9 ft armored gooseneck fits under a sink trap or into a short branch, and the 4.3 in LCD has adjustable brightness.
It also includes a mirror, hook and magnet for retrieving small items. The monitor has a self-storing kickstand, so you can set it on a level surface and work hands-free with both hands on the cable.
For long straight runs, reach for a plumbing snake camera with a longer cable instead.
How do you prepare the drain before the camera goes in?
Flush the drain with clean water and remove any strainer or plug first. A clear, slow-running line gives the camera the best view and the least resistance.
Run a tap or hose for a minute or two and watch how the water drains. Standing water tells you there is a blockage close by, so the camera has less distance to travel before it finds the problem.
Take out the drain cover or open the cleanout cap slowly. Keep a bucket under it, since trapped water often escapes as soon as the cap loosens.
Wipe the opening so grit doesn't cling to the lens on the way in.
How do you feed the camera down the drain line?
Push the head in by hand, a few inches at a time, and let the screen guide you. Forcing the cable is the fastest way to jam the head or scratch the pipe.
Hold the cable close to the opening so the head enters straight. Watch the monitor as you feed; a sudden dark patch or a change in the pipe's shape is your cue to slow down.
Stop when the head meets real resistance. If the cable buckles in your hand, back off and try a gentle twist rather than more force.
A drain camera is an inspection tool, not a clearing tool.
How do you get the head past a stubborn bend?
A long semi-rigid cable will not always turn a tight corner on its own. The Teslong instructions suggest running a drain auger or fish tape first to open the path, then following with the probe.
On longer runs, a plastic wiffle ball in front of the camera keeps the head off the pipe wall and helps it slide around bends. If the cable still stops, do not keep pushing, since a kinked cable feeds poorly for the rest of its life.
Back out and use the short borescope on the nearby branch instead.
How do you read what the camera shows?
Look for full-width blockages, wall buildup, cracks and roots, and note the cable depth at each one. The screen tells you what is there; the cable marking tells you where.
Grease and soap show as a thick coating that narrows the pipe. A crack or offset joint appears as a break in the pipe wall.
Roots look like a mat of fine strands pushing through a joint.
Keep the head moving slowly so you see the pipe as a continuous run, not a set of snapshots. The Teslong's split screen shows the view ahead and the pipe wall at once, so you can spot wall damage without turning the head.
Our guide to how to choose a drain camera explains how cable stiffness and screen size affect what you can see.
Why does the camera need a clean lens and a dry case?
A smeared lens blurs the whole inspection, and water left in the case can damage the cable and screen. Wipe the head before each entry and dry everything before you pack it away.
The Teslong kit recommends a plastic wiffle ball in front of the camera to keep it off the pipe wall. That small trick keeps the lens cleaner on long runs and is worth trying on a dirty line.
The Klein head carries an IP67 rating and adjustable LEDs with four brightness levels, so you can dial the light down when the pipe is shiny and brighten it when the run goes dark. Clear water helps the LEDs do their job.
Pull the cable out slowly and wipe it with a rag as it comes. Coil it loosely, store the monitor dry, and charge the battery before the next job so the screen doesn't die mid-run.
The Teslong monitor runs on a rechargeable 3000mAh battery, while the Klein runs about 3 hours on a charge.
How do you confirm a blockage or damage?
Pull the camera back slowly over the spot and look again from a slightly different angle. A single pass can misread a shadow, a joint or a reflection as damage.
Note the cable length when the head reaches the suspect area. Then back up a foot and push forward again to see the same point twice.
A real blockage or crack shows up in both passes. Captured stills and video help here, since you can review a frame on the 4.3 in screen or move the files to a PC over USB-C on the Klein.
If the head can't get past a bend, use the short borescope on the nearby branch, not to go further down the line. The Klein's 4.9 ft arm works well where the longer semi-rigid cable stops.
What should you do after the inspection?
Clear the clog with an auger or snake, not the camera, and keep the cable footage as a record. The camera found the problem; the right tool fixes it.
Write down each finding and its depth so you can compare next time. If the camera shows a cracked pipe, a collapsed joint or roots through the wall, call a plumber rather than snaking it yourself.
For long or stubborn blockages, a longer cable helps. The Milwaukee M12 reaches 75 ft through 1-1/2 in to 4 in lines, with an 18 mm HD head that pushes through tight bends.
Our roundup of the best sewer cameras for home use compares cable lengths and screen setups for different drains.
How do you keep the cable and screen working well?
Wipe, dry and coil the cable after every use, and store the kit somewhere dry. Dirt and moisture are the two things that shorten a drain camera's life.
Check the head and cable for kinks before each job. A kinked cable feeds poorly and can jam in a bend.
Charge the battery fully, since a dead screen halfway down a line leaves you pulling blind.
Clean the screen with a soft cloth and keep it out of direct sun when you store it. The Milwaukee kit's PACKOUT top-stack compatibility makes it easier to carry and store alongside other tools.
Which drain camera fits how you plan to use it?
For a first home inspection, the Teslong 50 ft dual-lens kit is the pick because the split screen shows the clog and the pipe wall together. For short traps and under-sink work, the Klein ET18's thin 5.5 mm gooseneck is easier to steer.
Choose the Milwaukee M12 if you regularly inspect long main lines up to 4 in. Whichever kit you use, the routine is the same: flush first, feed slowly, read the screen, and confirm each find with a second pass.
That is the short version of how to use a drain camera well. Prepare the line, keep the lens clean, and let the cable depth tell you where the problem sits before you reach for the auger.
Frequently asked questions
Can you use a drain camera without a plumber?
Yes. A drain camera with a semi-rigid cable lets you push a head down a drain and read the screen yourself.
It shows what is in the line and roughly where, but it does not clear a clog, so keep an auger or snake ready for the actual work.
How far should you push a drain camera?
Push only as far as the cable will feed without force. The Teslong kit runs 50 ft and the Milwaukee cable runs 75 ft, but most home clogs sit within the first 20 to 30 ft.
Stop when the head meets resistance, then check the screen before pushing more.
What should you look for on the camera screen?
Look for a full-width blockage, grease or soap buildup on the pipe walls, a crack or offset joint, and roots pushing into the line. Note the cable length marking when you spot each one so you know where to work or where a plumber should start.
Should you flush the drain before you inspect it?
Yes. Run clean water through the drain first so the camera sees the pipe rather than murky sludge.
Clear water also helps the head slide and keeps the lens from smearing as soon as it enters the line.
How do you keep the camera head and cable clean?
Wipe the head and cable with a damp cloth as it comes out of the drain, then dry them before coiling. A dirty lens shows as a blurry patch on the screen, and leftover water or grit inside the case can damage the cable over time.